


There is something to creating an image with your eye, your mind, and the camera, then taking it home and finishing the creating process by developing the film into a negative with your own two hands. I never feel more connected to photography than when I do it all myself. Bonus, after the initial investment you’ll save a ton of money on black & white film processing and you can do it any time of day or night!
10 easy steps to home developing!
What you’ll need:
Some exposed black & white film with images captured that will change the world…

Developing tanks & reels~ these I’ve had since high school! I’ve processed hundreds of rolls of film so it’s natural for me but something you should practice before tackling if you’ve never done it or it’s been awhile. I like this video on how to roll 120 film and this video for 35mm.
Containers for Chemicals.

A bottle opener for opening the flat side of a 35mm film canister to get the goods out.
Thermometer
Graduate for mixing chemicals
Film changing bag or tent (not photographed)~ I have had the cheapest one for 10 years, works great. This is where you’ll load your film onto the reels and into the developing tanks.

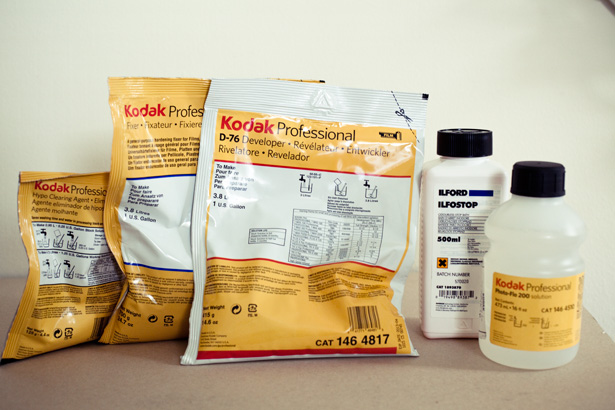
Chemicals! Here is what I buy. Kodak D-76 Developer, Ilford stop bath (ILFOSTOP), Kodak Fixer, Kodak Hypo Clearing Agent, & Kodak Photo-Flo
Mix the chemicals to their simple instructions. Always mindful of the temperate listed and making sure it is all dissolved before you stop stirring.

Be very organized. Label everything!

And if your obsessive like me, cut the instructions off of the packaging and tape to the bottle.

How it works (in a nutshell):
1: in your film changing bag load your film onto the reels into the developing tank and make sure the cap is sealed. If any light leaks in… disaster.
2: with your developer at the correct temperature (I have to put mine in the fridge for a bit to cool it down to 68 degrees) fill the developing tank up, agitate for 30 secs, you MUST tap it on the side of the sink or slam it down to release the bubbles off of the film, if you don’t you could have spots! Then for the time specified develop the film agitating for 5 secs every 30 secs. As you can see in the image below I keep the sink filled with the coldest my tap water will go to keep the temperate as stable as possible. Dump out developer when time is done.
3: Rinse with cold water
4: Fill tank with stop bath. Leave for 30 secs
4: Rinse with cold water
5: Fill tank with Fixer. Leave for 5-10mins. I agitate this the same as developer. Do Not pour Fixer down the drain! You can re-use it or put in a separate container to dispose of at a local photo-lab.

*After the film is fixed you can open the canister and peek at your developed negatives! I always do this because I’m impatient.

6: rinse with cold water for 30secs.
7: Full tank with Hypo Clear, leave for 1-2mins.
8: rinse with cold water for 5mins. *I just leave an open tank under the running cold water as in the image above.
9: Fill tank with water, add two drops of Photo Flo, agitate then dump out. This helps your film dry without water spots.
10: In as close to a dust free environment as you have (I use my bathroom) hang your film to dry with a clip on each end (I use cheap office clips). You’re supposed to use a squeegee down the length of your film, I use my fingers.

That is it! There is a variety of brands you can use, you can start pushing or pulling your film, over agitate for effect, process it in hot water to alter the images, all kinds of fun when you do it yourself. There are different ways to process film, this is just how I’ve always done it and what works for me.

Want to really save money?… you can omit Stop Bath, Hypo Clear and Photo Flo for much longer rinses with water but I find a cleaner more archival image by not omitting those steps.